Wheat bran biscuits
Posted: 16 November 2018 Filed under: baking, bread, cooking, food, recipes, whole grains 2 CommentsThese are too thin to be what we in the US think of as biscuits and they’re shaped more like cookies because they’re thin. You could roll the dough thicker but you’ll need to adjust the baking time.
Normally bran adds a lot of bitterness to a recipe. To solve this problem I discovered that rinsing it gets rid of most if not all of its bitterness. The boiling is for softening the bran.
For the rinsing, if you’re not sure if your strainer is fine enough, collect the first drainage into a glass container and examine it for bran. The strainer doesn’t need to be as fine as you might think because the bran swells from the soaking. I use one sold at my grocery store made by Good Cook; they come in 3 sizes and I use the middle one. It has a plastic rim and handle. Don’t do the straining method by using the handle; hold it by the rim or the handle will break. The first drainage from the soaking will be very cloudy and brown. The ones after that are not as brown but still slightly cloudy.
- 80 grams dry bran flakes, soaked, rinsed several times, and briefly boiled
- 1/4 teaspoon salt
- 2 tablespoons butter or oil
- 3 or 4 parts oat flour, masa, or other non-wheat flour
- 1 part vital wheat gluten
Optional:
- 2 tablespoons malt, barley or rye, or a teaspoon of sugar
- 20 grams molasses
- 2 tablespoons powdered milk
- 1/2 teaspoon vanilla
Soak the wheat bran in a pot in hot tap water for at least 10 minutes. Pour into a wire mesh strainer and shake out excess water by bringing strainer up to chest level then quickly lowering it and abruptly stopping at sink/waist level. Repeat until very little water comes out, about 10 times. Use care because as it loses the water it can bounce in the strainer. Rinse at least twice in hot tap water by putting it back in the pot and adding hot water and straining again.
Bring rinsed wheat bran to a boil, then drain into strainer, and rinse with cold water. Watch it carefully when bringing it to a boil because there is still starch and protein in it and it creates a foam which will boil over.
Put salt and oil (and optional molasses, malt, powdered milk, and vanilla) in mixer and mix. Add bran and mix well.
Stop mixer and add 3 (or 4) tablespoons of oat flour (or masa, etc.), then 1 tablespoon vital wheat gluten. Start mixer again after adding each tablespoon. Keep adding flour and vital wheat gluten as above, 1 tablespoon at a time. When dough cleans the side of the bowl and sticks to the paddle add another 2 or 3 tablespoons of flour and mix well. Dough will be sticky but will lose most of its stickiness after the rest. Err on the side of the dough being sticky.
Put dough into a quart yogurt container (grease or butter it first) with the lid or wrap in plastic and let rest for at least 2 hours, or overnight or a few days in the fridge.
Roll out to 1/4″ and cut into cookies with biscuit cutter or rectangles with a pizza cutter. I used a pizza cutter since then I don’t need to try and make more biscuits with the scraps; all of the pieces go into the oven after cutting.
Bake at 375 for 20 minutes, turn over, bake another 12 minutes. Cool on wire rack.
Lately I’ve been baking them at 400 for 15 minutes, and I’ve been baking them directly on a pizza stone, after the oven has been preheated for a long time so that the stone is hot. This gives them a nice brown bottom.
You may be wondering why there isn’t a liquid ingredient; that’s provided by the water retained by the wheat bran. So you don’t want to press it with a spoon to extract the maximum amount of water, just do the dropping thing, at least 10 times, until it’s mostly gone and you get some droplets.
I also don’t use baking powder since wheat bran tends to kill any rising ability of the dough. But since I haven’t tried using it I don’t know if they would puff up with it.
I finally weighed the flour before and after. I also proportioned the flour so that it’s 4 parts flour and 1 part gluten, by weight, giving a total of 5 parts. I started with 250 grams of barley flour, dividing that by 5 gave me 50 so I added 50 grams of gluten for a total mixed flour weight of 300 grams. I then spooned it into the wheat bran and stopped doing that when it started sticking to the paddle and cleared the sides of the bowl. I had used 213 grams of the barley flour and gluten mixture, in other words I had 87 grams of it left over. But my above math is a bit wonky since it’s not 1/5 of 300. According to my calculator 50 grams of 300 is 16.65%. According to google a high gluten bread (wheat) flour is 13% so I made something that’s a bit stronger than that, which is probably good considering all of the bran that’s in it. The dough is resting at the moment and we’ll see how it comes out.
With sorghum flour it was 112 grams of flour and gluten mixture left over, but I also upped the butter to 90 grams. As before, 250 grams of flour (sorghum) and 50 grams of vital wheat gluten.
The biscuits made with sorghum flour and gluten were not a success. They have a sort of sandy texture. With the oat flour they have a cohesiveness and smooth texture that the biscuits made with the sorghum flour lack. Although the flavor was good. In the future I’ll combine the sorghum flour with oat or barley flour, 50/50 say, for a total of 250 grams, and then add the 50 grams of gluten. Although I’ve never used it, I suspect that sweet rice flour would also work well in place of the oat or barley flour.
BeagleBone Black USB hard drive boot setup
Posted: 10 February 2014 Filed under: programming | Tags: beaglebone, linux Leave a commentAssumptions
I’m assuming that you have a USB hard drive. It must be self powered or getting its power from
a USB hub. Mine is USB 3 plugged into a USB 2 powered hub. A powered hub will have a wall wart that you plug into an electrical outlet. If your hard drive is USB 3 and your regular computer (Linux, Windows, etc.) has a USB 3 port you won’t need the hub while the USB hard drive is plugged into your regular computer.
I’m also assuming that you’ll be using Debian Linux. I agree with William Hermans that it looks to be the most stable and is well documented. It’s been around the longest and it probably has any and every package that you’ll ever need.
We’ll be modifying the uEnv.txt that’s tells the bootstrap software what’s where. I prefer to not fiddle with the provided Linux system that’s in the onboard flash so I’m using a micro SD (µSD) flash card. A 4 gig one is sufficient.
Warning: You may be able to edit the sdcard_setup.sh script on a Windows system and it’ll work. But if you edit the uEnv.txt file on a Windows system it will not work. Windows ends lines differently than Unix and u-boot requires lines that end the Unix way, not the Windows way.
Useful Linux disk commands. Read their man pages.
lsblk: lists all filesystems and drives.
sfdisk, parted: disk partitioning and partition resizing programs.
fdisk: disk partitioning. fdisk -l lists partitions and disk geometry.
mke2fs: initializes Linux filesystems (not needed for the swap partition).
mkswap: sets up a swap partition for swapping
Set up the µSD flash card for booting
Follow the instructions at http://elinux.org/BeagleBoardDebian where it says “Demo Image, Debian Stable (Wheezy)” and it runs the shell script setup_sdcard.sh. This makes a bootable µSD flash card with boot and root filesystems on the µSD card.
With my µSD card in my laptop I used the command
./setup_sdcard.sh --mmc /dev/sdb --uboot bone
On my laptop /dev/sda is the laptop’s drive and /dev/sdb is the µSd card.
After running this the first partition on the flash card is the boot filesystem, in DOS format (one of the FAT flavors, most likely FAT16) and the second filesystem is the root filesystem in Linux ext4 format. After these instructions you’ll continue to use the µSD card’s boot filesystem but its Linux ext4 root filesystem won’t be used because you’ll be using the Linux ext4 root filesystem on the USB hard drive. The reason I’m going this route with an eventually unnecessary and unused root filesystem on the µSD card is that the procedure is easy and straightforward, and it produces an µSD card that’s testable, and as I said previously, I want to leave the onboard flash memory filesystems unchanged.
After the installation finishes put the card in the BBB’s µSD slot (if you were using another computer to set up the card) and boot the BBB (being sure to properly shut down the BBB Linux that may have been running with the halt or shutdown commands). The BBB should sense the µSD card and boot to it instead of the onboard flash memory. You can verify that it’s booted to the µSD card by using the lsblk command. Its output should be
NAME MAJ:MIN RM SIZE RO TYPE MOUNTPOINT

mmcblk1boot0 179:16 0 1M 1 disk

mmcblk1boot1 179:24 0 1M 1 disk

mmcblk0 179:0 0 14.6G 0 disk

+-mmcblk0p1 179:1 0 96M 0 part /boot/uboot

+-mmcblk0p2 179:2 0 14.5G 0 part /

mmcblk1 179:8 0 1.8G 0 disk

+-mmcblk1p1 179:9 0 70.6M 0 part

+-mmcblk1p2 179:10 0 1.7G 0 part
mmcblk0 is the µSD card while mmcblk1 is the onboard flash memory. It shows mmcblk1boot0 and mmcblk1boot1 because it starts booting from the onboard flash memory but switches over to the µSD flash card to finish booting. If your USB hard drive is connected there may be lines for it as well. The important lines are the ones that end with /boot/uboot and /; they say that those two mounts are coming from mmcblk0, the µSD flash card.
Set up the USB hard drive
Before you can set up the USB hard drive you need to make a modified version of the sdcard_setup.sh shell script. Use the diffs below to see what needs to be changed. Make a copy of sdcard_setup.sh and give it the name sdcard_setup_usb.sh.
After you’ve made the modified setup_sdcard_usb.sh you set up the USB hard drive the same way you set up the µSD flash card; plug the drive in and run the setup_sdcard_usb.sh script with the same options, except that if you’re doing this on the BBB the drive’s name is /dev/sda.
Final notes
After changing the uEnv.txt file the µSD card will no longer boot to itself and expects there to be a USB hard drive connected to the BBB. When you update your Linux system on the hard drive, the files on the SD card’s boot partition and Linux partitions won’t get updated unless you do that specifically. I’d keep a copy of the original uEnv.txt on the µSD card’s boot filesystem in case you’d like to boot to the card, for example, to fix something on the hard drive if it becomes unbootable. The ext4 root filesystem on the µSD card is unused when you’ve booted to the USB hard drive.
In some ways editing and running the sdcard_setup.sh script might seem odd, but for me it seemed the most straightforward. Since we know it will give us a good running system on the µSD card we can be reasonably confident that it will do the same for the USB hard drive. I’ve written many shell scripts so it wasn’t scary for me to modify sdcard_setup.sh.
Diffs for setup_sdcard.sh and uEnv.txt
In the following diffs on pastebin, for the normal diff the brown lines are the old lines and the green lines are the new lines with the less than signs preceding the old lines and the greater sign preceding the new or added lines. For the context diffs changed and added lines are in blue and preceded by an exclamation mark. Some added lines are preceded with a plus sign and are green.
Diffs for setup_sdcard.sh are on pastebin at http://pastebin.com/WhqdnAuL with the context diff at http://pastebin.com/8rWBZfqi . The context diff gives 3 lines of context so that you can more easily find where to make the changes.
The first change is to add a line to the lines fed to sfdisk; the added line is for the swap partition, size at 1000 megabytes. Next are the changes for the partition number change; where there is a ${media_prefix}N where N is a 2, it’s changed to 3 for the root partition (1 is the DOS boot partition, 2 is the swap partition, and 3 is the ext4 root partition). Then there’s the added mkswap command, to enable swapping on the second partition. Next are changes and additions to the /etc/fstab file, to use sda3 for the root filesystem and to add sda2 for the swap partition.
Diffs for uEnv.txt are on pastebin at http://pastebin.com/hiL0FU7j with the context diffs at http://pastebin.com/9JwjDb3C .
First we create a variable bootdev for specifying the usb drive. Next we change the root to /dev/sda3. Then we change the load lines to use load usb instead of load mmc and use bootdev instead of mmcdev and mmcpart. Finally we change the uenvcmd and add usb start at the beginning.
The modifications to the uEnv.txt file I figured out from reading William Hermans’ Embedded Hobbyist web page; I wouldn’t have had a clue otherwise.
Bibliography
- Robert C. Nelson’s web page for the BeagleBone Black at eewiki (Digi-Key).
- http://eewiki.net/display/linuxonarm/BeagleBone+Black
- Robert C. Nelson’s web page at elinux.org.
- http://elinux.org/BeagleBoardDebian
- William Hermans’ Embedded Hobbyist web pages. The only instructions I’ve found for booting with a USB hard drive.
- http://www.embeddedhobbyist.com/debian-tips/beaglebone-black/beaglebone-black-usb-boot/
- Texas Instruments Wiki pages.
-
http://processors.wiki.ti.com/index.php/Linux_Core_U-Boot_User’s_Guide
http://processors.wiki.ti.com/index.php/AMSDK_u-boot_User%27s_Guide - Some u-boot and potentially other useful stuff.
- http://www.crashcourse.ca/wiki/index.php/BeagleBone_Black
- U-boot home page. Useful stuff under the Documentation link. The Introductory Presentation was informative for me even though it’s marked as quite old. It explains how commands can be stored in environment variables which I had found confusing until I’d read this.
- http://www.denx.de/wiki/U-Boot
syslinux install
Posted: 31 March 2013 Filed under: arch linux, laptop Leave a commentNeed to install the gptfdisk package before the syslinux-install_update -i -a -m command will work.
pacman -S gptfdisk
hardwired network
Posted: 31 March 2013 Filed under: arch linux, laptop Leave a commentNetwork interface is enp2s1.
Turn on dhcp:
# systemctl enable dhcpcd@enp2s1.service
boot firmware error message
Posted: 30 March 2013 Filed under: arch linux, laptop Leave a commentInstall the wireless interface’s firmware with:
pacman -S ipw2200-fw
Or, if you won’t be using the wireless interface, add to /etc/modprobe.d/modprobe.conf
blacklist ipw2200
to get rid of the boot message about failing to install the firmware.
static ip address
Posted: 24 March 2013 Filed under: arch linux, raspberry pi Leave a commentEdit /etc/network.d/ethernet-eth0 and comment out the dhcp entry and add this:
CONNECTION='ethernet'

DESCRIPTION='A basic static ethernet connection using iproute'

INTERFACE='eth0'

IP='static'

ADDR='192.168.1.3'

GATEWAY='192.168.1.1'

DNS=('76.14.0.8' '76.14.0.9' '76.14.96.14')
resizing the raspi flash card
Posted: 23 March 2013 Filed under: arch linux, raspberry pi Leave a commentBefore running fdisk I brought the system down to single user and remounted the root partition read-only. In the following the # is root’s prompt.
# systemctl rescue

# mount -o ro,remount /

# fdisk /dev/mmcblk0
Delete the second partition /dev/mmcblk0p2.
d

2
Create a new primary partition and use default sizes prompted. This will then create a partiton that fills the disk.
n

p

2

enter

enter
Save and exit fdisk:
w
Reboot, go single user, and run resize2fs:
# shutdown -r now

# systemctl rescue

# resize2fs /dev/mmcblk0p2
Your main / partition should be the full size of the disk now. Don’t remount the root partition read-only before you run resize2fs; resize2fs fails if it’s mounted read-only.
After running resize2fs reboot, go to single user, remount root read-only, run e2fsck, then reboot to bring the system back up multi-user:
# shutdown -r now

# systemctl rescue

# mount -o ro,remount /

# e2fsck /dev/mmcblk0p2

# shutdown -r now
single user mode and read-only mounting
Posted: 21 March 2013 Filed under: arch linux, raspberry pi Leave a comment-
Bring the system down to single user mode:
# systemctl rescue -
Remount root readonly
mount -o ro,remount /
Doesn’t work on the laptop; complains that the filesystem is busy.
Test fishermen’s rib with cotton yarn 2
Posted: 23 December 2011 Filed under: knitting 1 CommentI made this one with size 7 needles; the previous one was with size 10 needles. The cotton is the Sugar ‘n Cream, Earth Ombre color, worsted weight; it calls for US #9, 5.5 mm needles.
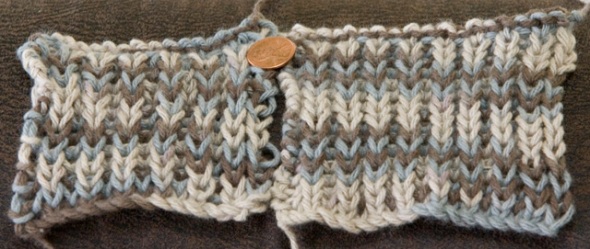
I think I like the version made with size 7 needles better; it’s a little tighter but not too tight. It’s the one on the right; the left one is the one made with size 10 needles.
It will be interesting to see how they look after a run through the washer and dryer.

